
One of the things I love about being back in SF, and particularly our new neighborhood, is that there are so many restaurants and shops within walking distance. I seem to find a new gem every time I venture out. On my last excursion, I stumbled upon a seemingly unremarkable Russian market and thought I’d check it out. I’ve learned that the seemingly unremarkable can end up being a pleasant surprise, and this market was just that. There was a small but clean meat counter offering veal chops, oxtail and other cuts you probably won’t find at your national brand supermarket. The refrigerator isle had a nice selection of cured northern European-style meats and cheeses. But it was the fresh produce that caught my eye. They had beets that looked like they’d just been harvested that morning. I just couldn’t pass them up. I bought several pounds with the intention to can most of them, and I thought a nice beet salad served along side our frankfurters wouldn’t be a bad idea either.
My BFF back in Portland introduced me to this side dish. You’ll find similar versions at grocery stores like Zupans and Whole Foods, but it’s so simple, anyone can make it, and I find it tastes just as good or better than store-bought. As with any dish, success depends on the quality of the ingredients. Use good sherry or white wine vinegar and olive oil for the dressing. Toast the pecans or walnuts yourself (it really doesn’t take very long) and don’t be tempted to use a pre-crumbled blue cheese. Use the good stuff⎯you’ll be rewarded.
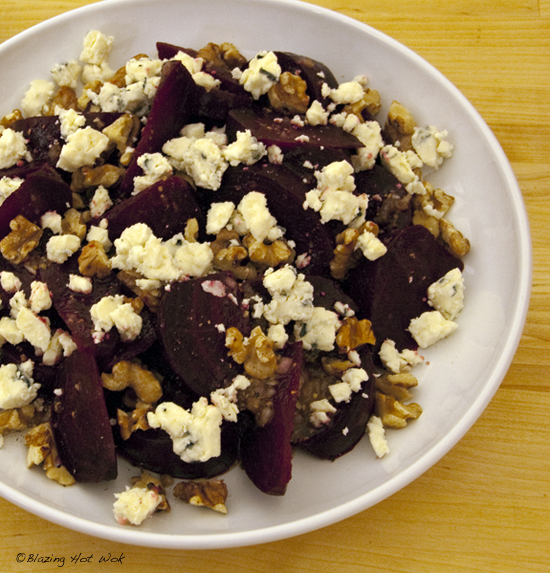
Beet salad with blue cheese and walnuts
Serves 4 as a side dish
4 to 5 medium beets (about 2.5 inches in diameter), tap root and stalks trimmed
1/2 shallot, finely chopped
1/2 clove garlic, minced
a few sprigs thyme, leaves only (or other fresh herb of choice) (optional)
1 tbs Dijon mustard (or coarse ground mustard)
1 tbs honey (more or less to taste)
3 to 4 tbs sherry or white wine vinegar (more or less to taste)
2 tbs olive oil
kosher salt and fresh cracked black pepper, to taste
about 1 oz toasted walnuts or pecans, coarsely chopped
about 2 oz blue cheese (not creamy type), crumbled
You may decide to roast your beets. They can also be boiled or steamed. In any case, they will take about 45 minutes, maybe more. My preferred method for use in this salad is to pressure cook them on a rack with 1.5 cups water. It takes just 20 minutes from start to finish⎯ 5 minutes to get up to pressure and 15 minutes to cook. Release the pressure immediately and transfer the beets to a plate to cool enough to handle.
While the beets are cooling, make the dressing. Combine the shallots, garlic, fresh herbs, mustard, honey and vinegar in a medium-large mixing bowl. Give it a good whisk, then taste it. Add more vinegar or honey to taste. (Remember to account for the sweetness of the beets and the fact that you will be adding oil to temper the acidity.) Whisk in the oil.The dressing doesn’t have to be completely emulsified, just as long as the it’s all mixed together pretty well. Add the salt and pepper to taste.
Once the beets are cool enough to handle, peel them. This should be fairly simple. Slice the end of the root side off and the skin should start to slip off. I like to cut the beets into wedges, but you may decide to slice or dice them.

This salad is best served just slightly chilled or at room temperature. Assemble the salad about 10 or 15 minutes before you plan to eat it. You can toss the beets with the dressing in a separate bowl then transfer them to your serving platter. Sprinkle the nuts and crumbled cheese on top. Alternatively, just arrange the beets on your serving platter, drizzle the dressing on top and sprinkle the nuts and cheese on last. That’s it!
A couple of comments:
If using golden beets, I recommend white wine vinegar. The darker sherry vinegar makes the salad look less vibrant, but the flavor is still fine.
Baby spinach makes a wonderful addition to this salad. Make a bed of it to lay the beets on.
I’ve substituted beets that I pickled and canned myself. It works very well. Just cut down on the vinegar or eliminate it completely. It’s still so good.
Enjoy!


